NFS - Network File System
This section will cover ways to enumerate Network File System (NFS).
Table of Contents
- Overview
- Default Configuration
- Dangerous Settings
- Enumerating NFS
- Nmap
- showmount
- mount
Overview
Network File System (NFS) is a protocol used between Linux and Unix based systems. This means that NFS clients cannot directly communicate with SMB servers. Similar to SMB, users have to authenticate to use NFS.
The below table shows the different NFS versions and their description.
| Version | Description |
|---|---|
| NFSv2 | It is an old version but is supported by many systems and was initially operated entirely over UDP. |
| NFSv3 | It has more features, including variable file size and better error reporting, but is not fully compatible with NFSv2 clients. |
| NFSv4 | It includes Kerberos, works through firewalls and on the internet, no longer require port mappers, supports ACLs, applies state-based operations, and provides performance improvements and high security. It is also the first version to have a stateful protocol. |
A significant advantage of NFSv4 over its predecessors is that only one UDP or TCP port 2049 is used to run the service, which simplifies the use of the protocol through firewalls.
NFS is based on the Open Network Computing Remote Procedure Call (ONC-RPC/SUN-RPC) protocol exposed on TCP and UDP port 111, which uses External Data Representation (XDR) for the system-independent exchange of data.
NFS has no mechanisms for authentication and authorisation. Instead authentication is completely shifted to the RPC's protocol's options. The authorisation is derived from the available file system information.
The most common authentication is via UNIX UID/GID and group memberships, which is why this syntax is most likely to be applied to the NFS protocol.
One problem with the authentication mentioned earlier is that the client and server do not necessarily have the same mapping of UID/GID to user and groups. No further checks can be made. This is why NFS is only used in trusted networks.
Default Configuration
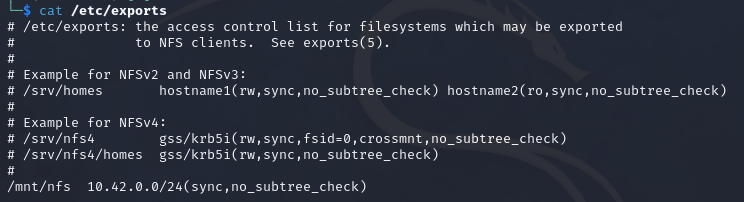
The /etc/exports file contains a table of physical filesystems on an NFS server accessible by the clients. The NFS exports table shows which options it accepts and thus indicates which options are available to us.
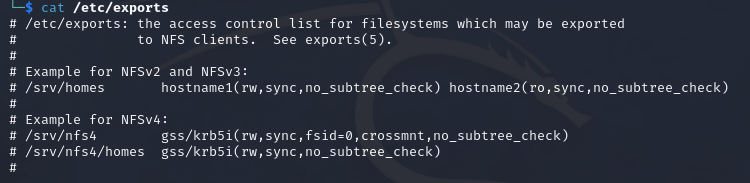
The default file also contains examples of configuring NFS shares. First, the folder is specified and made available to others, and then the rights will have on this NFS share are connected to a host or subnet. Additional options can be added to the hosts or subnets.
The below table will list some options and their respective descriptions.
| Option | Description |
|---|---|
| rw | Read and write permissions. |
| ro | Read only permissions. |
| sync | Synchronous data transfer. (A bit slower) |
| async | Asynchronous data transfer. (A bit faster) |
| secure | Ports above 1024 will not be used. |
| insecure | Ports above 1024 will be used. |
| no_subtree_check | This option disables the checking of subdirectory trees. |
| root_squash | Assigns all permissions to files of root UID/GID 0 to the UID/GID of anonymous, which prevents root from accessing files on an NFS mount. |
We can use the following command as to create an example.
echo '/mnt/nfs 10.42.0.0/24(sync,no_subtree_check)' >> /etc/exports
Command breakdown:
echo '/mnt/nfs 10.42.0.0/24(sync,no_subtree_check)'- Specify the text to output.>>- Specify to add the output to the end of the specified file./etc/exports- Specify the file to append to.
Once done, we will need to restart the service. We can do this by using the command systemctl restart nfs-kernel-server. We can view the exported files using the command exportfs.
What we have done for example is share the/mnt/nfs directory to the 10.129.14.0/24 subnet. This means that all host on this subnet will be able to mount the NFS share and inspect the contents of the directory.
Dangerous Settings
The below table will show some options that can be considered dangerous.
| Setting | Description |
|---|---|
| rw | Read and write permissions. |
| insecure | Ports above 1024 will be used. |
| nohide | If another file system was mounted below and exported directory, this directory is exported by its own exports entry. |
| no_root_squash | All files created by root are kept with the UID/GID 0. |
It is recommended to create different directories with different permissions to see how it all works.
Enumerating NFS
When footprinting NFS, we can focus on ports 111 and 2049 as these are the ports NFS uses. There are many tools we can use to do it.
The tools that will be covered here are:
- Nmap
- showmount
- mount
Nmap
We can use nmap and the following command to gather information:
nmap -sV -sC -p 111,2049 10.42.0.1
Command breakdown:
-sV- Scan the version of the services.-sC- Use default NSE scripts.-p 111,2049- Specify to scan port 111 and 2049.10.42.0.1- Specify the target to scan.
We can target port 111 and 2049 as these are the ports used by default. If it configured to use different ports we may need to perform more enumeration.
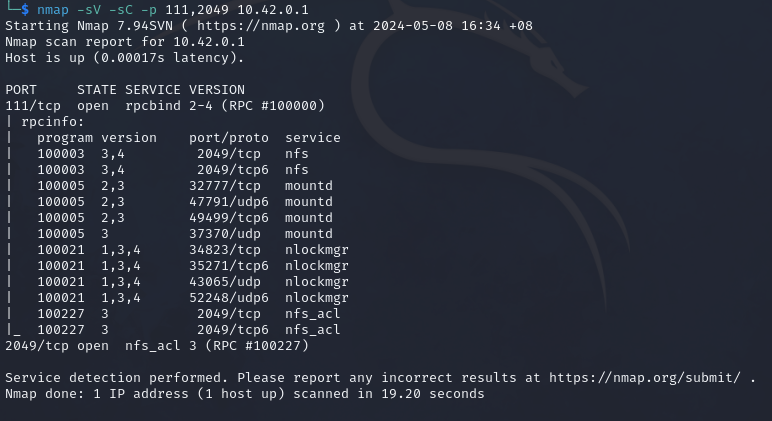
The rpcinfo NSE script retrieves a list of all currently running RPC services, their names and description, and the ports they use. This allows us to check if the target share is connected to the network on all required ports.
There are other scripts we can use within NSE that is specially made for enumerating NFS.
Once we have identified the mounts available mounts on the server, we can use the showmount and mount commands.
showmount
We can use the following command to view a list of the exported file systems on the target:
showmount -e 10.42.0.1
Command breakdown:
-e- Show the list of exported file systems on the target.10.42.0.1- Specify the target IP address.
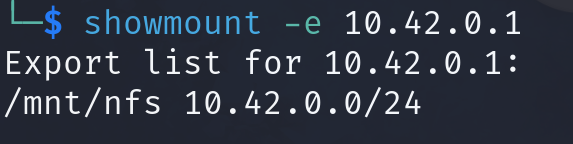
We can see from the above screenshot that we can mount /mnt/nfs from the target server.
Once we have identified what to mount, we can use the mount command.
mount
Before mounting a share, we have to create a directory to mount it to. An example will be:
mkdir mymount
Once the directory is created, we can use the "mount" command.
mount -t nfs 10.42.0.1:/ ./mymount/ -o nolock
Command breakdown:
-t nfs- Specify the file system type.10.42.0.1:/- Specify the target and the directory to mount../mymount/- Specify the directory to mount to locally.-o nolock- Disables file locking.
Once mounted, we can explore the file system and discover any files that can aid in our engagement.
We can view the access rights and the usernames and the groups to who the show and viewable files belong to. As we have the usernames, group names, UIDs, and GUIDS, we can create them on our machine and adapt them to the NFS share to view and modify the files.
To list the contents with the usernames and group names, we can use ls -l mnt/nfs. To list the UIDs and GUIDs, we can use the ls -n mnt/nfs.
It is important to note that if the root_squash option is set, we cannot edit the backup.sh file even as root.
We can also use NFS to gain more access to the target system.
For example, if we have SSH access to the target and want to read a files from another directory that only a specific user can read, we would need to upload a shell to the NFS share that has the SUID of that user and then run the shell via the SSH user.
Once we have done everything we need to do, we can unmount the share by using the following command:
umount ./mymount
Command breakdown:
./mymount- Specify the directory to unmount.

There are many other tools we can use to enumerate NFS.